Quickstart
This manual will give you all the information you need to use a HPC cluster. In the additional content after this page, you will find more specialised guides, tutorial and references.
Introduction
HPC stands for High Performance Computing. Commonly this refers to a cluster of servers with resources shared by multiple people. To manage resource allocation a scheduler is used that, based on your definitions, creates an isolated work environment to run code. As the resource is shared and not always available, jobs can be queued for a while before they are run by the scheduler. No instant access to resources is guaranteed.
How can HPC help you?
- Your work has outgrown your personal device's resources.
- Your work runs for hours or days and prevents you from using your personal device for other work.
- You do not have the right resources, like GPU, available to you in your personal device.
- You don't have the resources to acquire an own powerful computer and maintain it.
Architecture
HPC can be built in in different configurations. This configuration is very popular and you will see it in many HPCs:
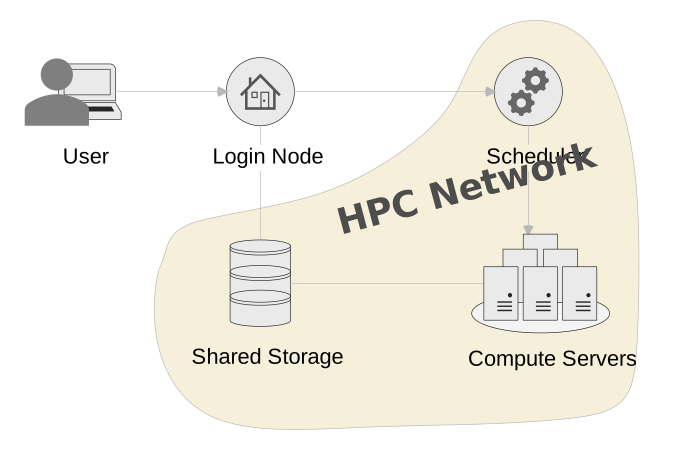
The HPC is made up of these components:
- Login Node: This is the system all users interact with. If you want to use any of the other components, it has to be through the login node.
- Scheduler: This is the brain of the cluster. All your scheduling and status requests from the login node go to this system.
- Compute Servers: This symbolises all compute servers you could get allocations from through the scheduler. You should not access the servers directly unless you have an allocation.
- Shared Storage: Most of the storage you interact with on the cluster is shared between the login node and all available compute servers. Therefore you can manage the data you need within your jobs from the login node.
- HPC Network: The network is shut off from the Campus network and therefore systems within it, will not be accessible to users outside of the login node.
How does HPC work?
You will be submitting "work packages" in form of submission scripts, that define your resource requirement, an educated estimation of how long your job will run, and the workflow you want to run. Your work should run fully autonomous, this means no human interaction like GUI or console inputs. You can also have interactive sessions through HPC, these are useful for environment preparations, tests and debugging, but should be avoided for large production work.
Your work package will be queued by the scheduler. The scheduler will decide where your job can run, based on your resource requirements described. Multiple jobs can run on one server. If there is enough resource available your job might run right away, otherwise it will be queued and run at a later time. You should be able to provide contact information, and the scheduler will keep you in the loop if your job has started, finished or failed.
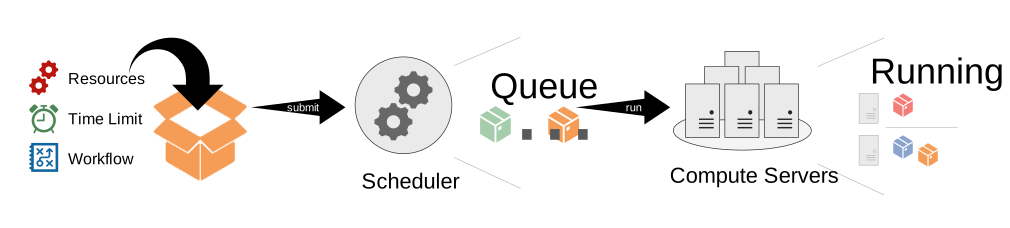
Scheduling is a complicated matter, and multiple factors play into the priority of your job, however generally, the smaller your job, the faster it will run, so it pays out to be efficient!
Access the Cluster
After you got your account, you can log into the login node. The login node is the central point of access to the cluster for all users. This server is not very powerful and should therefore not be used for computational work. Any computational work should go through a job allocation on the scheduler.
Info
You have to be connected to the Campus network either via LAN, eduroam or VPN to access the cluster.
Connection Information
- Hostname:
lochan.hpc.gla.ac.uk - Port: 22
- Username: University of Glasgow GUID
- Password: GUID Password
- Hostname:
petrarch_esd.hpc.gla.ac.uk - Port: 22
- Username: University of Glasgow GUID
- Password: On first login provided by Administrator
Please change your password upon first login using the command passwd
- Hostname:
mars-login.ice.gla.ac.uk - Port: 22
- Username: University of Glasgow GUID
- Password: The password to your University of Glasgow account
Access through Browser
You can access the Cluster through the Alces Flight Website. Just open a browser of your choice, for example Chrome, and go to https://mars-login.ice.gla.ac.uk.
At the top right of the site you will see a log in button. If you already have an account, you can authenticate with your University of Glasgow GUID + Password.
As described on the site you can access a console, interactive desktop, file manager and job manager from there. More information on the usage of these tools follows soon!
GUID must be in lowercase ex: 999999x or xx999x
We recommend setting up SSH key authentication. See SSH Key Authentication for help.
The same information can also be used to log in via SFTP to copy files from your local device onto the system.
Connecting via SSH Command
You will need to use SSH to connect to the login node and use the HPC. The simplest way to connect is by opening a console or a terminal program and connect using the preinstalled SSH utility of your device (If you are prompted for a password, it will not show up while typing):
We would recommend you use a SSH GUI client for regular access to the platform, as it allows you to save sessions, and copy+paste more easily. Example software are PuTTY and MobaXterm, however you can use whatever you prefer.
Data Management
Data is an important part of HPC. Where and how to store your data is important for efficient usage of the platform.
All storage available is to be used for the duration of your work. It is not expected to provide long term/primary storage. The data will assumed to be transient with only limited protection. As the HPC is not a primary storage solution, we recommend storing all HPC data you can’t afford to lose in a primary, safe location like a centralised storage system provided by your school or a Team within Microsoft Teams.
We recognise this is an issue for many schools and it is on the radar as a future area that requires attention.
You can use Rclone to manage your data.
Storage Spaces
Warning
This is not a trusted research environment, therefore all research data must be anonymised prior to transferring it onto the system.
User Home
| Size | 100G (quota per user) |
| Path | /mnt/home/<GUID> |
| Use | Set up your environments and store all the scripts and data you need for your personal use. |
| Clean-up | N/A |
| Backup | Limited backups of home storage is available, please contact via Ivanti Support Request. |
Shared User Scratch
| Size | 145Tb (shared between all cluster users) |
| Path | ~/sharedscratch or /mnt/scratch/<GUID> |
| Use | This storage is shared between all nodes. Read and write data that you need during your jobs. Please ensure to clean up your scratch space after you are done processing your job, to make the space available for other users to use! |
| Clean-up | Files not accessed for longer than 2 weeks will be automatically deleted. |
| Backup | N/A |
Localscratch
As the cluster is very heterogeneous, the localscratch also varies between nodes. To get an overview how much is available on each node, see the output of the command below. The value for TMP_DISK is in MiB.
To ensure you get a node with enough localscratch, use the --tmp parameter in your Slurm submission!
| Size | Up to ~5Tb per node |
| Path | ~/localscratch or /tmp/localscratch/<GUID> |
| Use | All nodes have a scratch storage space that is dedicated to that node and not shared with others. We recommend running your jobs here, if they only run on one node, especially if they are read/write intensive. Don’t forget to move your data to a shared storage within your job, after you are done processing! |
| Clean-up | Files left abandoned after a job has finished, may be deleted by administrators. |
| Backup | N/A |
Warning
This is not a trusted research environment, therefore all research data must be anonymised prior to transferring it onto the system.
User Home
| Size | 100G (quota per user) |
| Path | /mnt/home/<GUID> |
| Use | Set up your environments and store all the scripts and data you need for your personal use. |
| Clean-up | N/A |
| Backup | Limited backups of home storage is available, please contact via Ivanti Support Request. |
Shared User Scratch
| Size | 40Tb (shared between all cluster users) |
| Path | ~/sharedscratch or /mnt/shared-scratch/<GUID> |
| Use | This storage is shared between all nodes. Save and write data that you need between your parallel and array jobs that run on multiple nodes simultaneously. Also, if Local Node Scratch is not sufficient, use this instead, as it has a larger capacity. |
| Clean-up | Files not accessed for longer than 4 weeks will be automatically deleted. |
| Backup | N/A |
Local Node Scratch
| Path | ~/localscratch of /tmp/local-scratch/<GUID> |
| Use | All nodes have a scratch storage space that is dedicated to that node and not shared with others. We recommend running your jobs here, if they only run on one node, especially if they are read/write intensive. Don’t forget to move your data to a shared storage within your job, after you are done processing! |
| Clean-up | Files not accessed for longer than 2 weeks will be automatically deleted. |
| Backup | N/A |
Warning
This is not a trusted research environment, therefore all research data must be anonymised prior to transferring it onto the system. More information on the can be found here Research Data on MARS: What to Know.
Home Storage
| Size | 40Gb (quota per user) |
| Path | /users/<GUID> |
| Use | Data Storing Set up your environments and store all the scripts and data you need for your personal use. |
| Clean-up | N/A |
| Backup | N/A |
Project Storage
| Size | As requested in application (2.6Pb in total) |
| Path | /mnt/data/project<ProjectNumber> |
| Use | Data Storing Save scripts and data you and the colleagues in your project use together. Each project is assigned dedicated space. The size of this space is dependent on what was requested in the original Project application, but can be extended on request. You will be told the "ProjectNumber" when the project has been created on MARS. |
| Clean-up | N/A |
| Backup | N/A |
Shared User Scratch
| Size | ~180Tb (shared between all cluster users) |
| Path | ~/sharedscratch or /mnt/scratch/users/<GUID> |
| Use | Data Processing This storage is shared between all nodes. Read and write data that you need during your jobs. Please ensure to clean up your scratch space after you are done processing your job, to make the space available for other users to use! |
| Clean-up | Unused data may be deleted at any time by an administrator. |
| Backup | N/A |
Local Node Scratch
| Size | Varies depending on the node type (shared between all node users): CPU Nodes: 400Gb CPU+ Nodes: 400Gb GPU Nodes: 700Gb GPU+ Nodes: 1.7Tb |
| Path | ~/localscratch or /tmp/users/<GUID> |
| Use | Data Processing This storage is local to the node and can’t be accessed outside of it. Read and write here for the best possible storage performance. If you drop files into the localscratch of the login node it won’t be available to you on the compute nodes, so the moving of data has to be part of your workflow / submission script. Please ensure to clean up your scratch space after you are done processing your job, to make the space available for other users to use! |
| Clean-up | Unused data may be deleted at any time by an administrator. |
| Backup | N/A |
Storage Quotas
There are quotas set up across the cluster for different filesystems / shares. A quota means you are unable to write data after that quota is reached. These quotas are set up, to prevent users from using the cluster as data storage. The cluster should only be used to process data, any results or unused data should be moved off, after a job has finished running. The login node and all compute nodes, can connect to other campus systems or the internet, to perform data transfers.
| Name | Path | Soft Limit | Hard Limit |
|---|---|---|---|
| User Home | /mnt/home | 100GiB | 120GiB |
Filesystem Quotas
| Name | Path | Soft Limit | Hard Limit | Grace Period |
|---|---|---|---|---|
| User Home | /mnt/home | 100GiB | 120GiB | 7 days |
| Shared Scratch | /mnt/shared-scratch | 2000GiB | 2100GiB | 7 days |
| Name | Path | Soft Limit | Hard Limit |
|---|---|---|---|
| User Home | /users | 40GiB | 50GiB |
If you are over your quota's hard limit or past your grace period exceeding the soft limit you will get the following errors when working on the system: Disk quota exceeded
In addition, when logging into the login node, you should get a warning in the console
More information on quotas can be found here Quota
Data Transfer
To transfer data from your local machine (or another system), you have different options:
SFTP
Secure File Transfer Protocol (SFTP) is a protocol to transfer data between systems using SSH. There are multiple ways to make use of the protocol:
If installed, you can use sftp from a command prompt on your personal device:
After connecting you can use sftp commands in your interactive sessions. More information on that here: SFTP ManualThere are also easy GUI applications, for example WinSCP. Use the connection details of the login node, mentioned above to connect.
You can also use your SSH key to authenticate. More information: SSH key authentication or you can find more info in the manual for the specific software you are using.
SCP
Use scp (secure copy) to easily copy data between two systems via your console.
or- replace
<mykeyfile.pem>with the name of your SSH public key (if you dont have SSH key authentication set up, ignore the -i parameter). More information on creating an SSH key can be found here SSH Key Authentication. - replace
<source file>with the path/name of the file you want to transfer from your local device. - replace
<guid>with your username - replace
<targetfile>with the path/name of where you want the file to go on the target device.
Cloud Storage
If you need to access cloud storage from the system directly, you can make use of rclone. More information can be found in our software manual: Rclone.
Web File Manager
For certain systems that are managed by Alces web file access and management can be used.
Datasets
There are currently no managed data sets on Lochan
There are currently no managed data sets on GES-Petrarch
Blast nr database
| Path | /mnt/data/datasets/blast/nr/latest or/mnt/data/datasets/blast/nr/<YYYY-MM-dd> |
| Source | NCBI |
| Update | Weekly, Saturday 07:00 |
| Retention | 30 days |
| Description | The most recent version of the "nr" database on MARS can be found in a link called "latest" otherwise the dated versions can be found in the base directory. A new version of the database is downloaded every week on Saturday 07:00, but the download takes hours, and the "latest" link is only updated once the download is complete. Versions older than 30 days will be deleted. |
Blast nt database
| Path | /mnt/data/datasets/blast/nt/latest or/mnt/data/datasets/blast/nt/<YYYY-MM-dd> |
| Source | NCBI |
| Update | Weekly, Saturday 07:00 |
| Retention | 30 days |
| Description | The most recent version of the "nt" database on MARS can be found in a link called "latest" otherwise the dated versions can be found in the base directory. A new version of the database is downloaded every week on Saturday 07:00, but the download takes hours, and the "latest" link is only updated once the download is complete. Versions older than 30 days will be deleted. |
Scheduler
The scheduler used is Slurm Workload Manager, developed by SchedMD. Slurm has a very in depth documentation themselves, which could be useful to read through, for a more in depth understanding of how this software works Quick Start User Guide. We also have the following two resources which could be useful if you need more help using Slurm:
- Slurm Tutorial: A tutorial to work though and learn what job scheduling can.
- Slurm Guide: Page explaining different Slurm utilities and how to use them.
Resources
Compute servers - also referred to as nodes - can carry different resource configurations to fit different workloads. For example, some servers might offer high amount of CPU, while others offer GPU resource.
Lochan is very heterogeneous, meaning it is comprised of a vast variety of hardware! You can get an overview of all servers and their available resources by running the command below on the system:
Explanation of command output
- CPUS: Number of CPUs available on the node.
- MEMORY: Amount of memory / RAM available on the node in MiB.
- TMP_DISK: Available localscratch on node in MiB.
- GRES: GPU resources available on the node.
gpu:<type>:<amount>.
More info is coming soon.
More info is coming soon.
Partitions / Queues
Partitions, also known as queues on other scheduling systems, are used to determine which nodes you want your job to run. Partitions are used to categorise jobs. Different partitions in Slurm can have different resources, and boundaries configured, this is to support different workloads.
To see the partition configuration of the HPC you are using run this command:
A specific partition can be requested, by specifying it with the --partition parameter for all Slurm submission commands. Example:
| Partition | Description | Nodes |
|---|---|---|
| cpu | This is the default partition, meaning this is chosen when no partition is specified. It contains all CPU focused servers of the Cluster. | node[011-021,023] |
| mpi | There are four identical servers on Lochan which lend themselves to be used for MPI jobs. Use this partition, to guarantee to get onto these nodes for large multi-node mpi jobs. | node[018-021] |
| gpu | This partitions contains all servers with GPU resources available. You can specify which type with the --gres parameter. |
gpu[003-004] |
| Partition | Description | Node List |
|---|---|---|
| cpu | All Small Nodes servers. This is the default partition if none is defined. | node[001-006] |
| cpuplus | All Large Nodes servers | node[007-008] |
| cpuall | Both Small Nodes and Large Nodes servers | node[001-008] |
| gpu | All GPU Nodes | node[009-010] |
| Partition | Description | Specifications | Count | Node List |
|---|---|---|---|---|
| nodes | This is the default partition if none is defined | 2x AMD 7543 Processors @2.8Ghz 32 cores each CPU 512Gb RAM |
9 | node[01-09] |
| smp | CPU+ Nodes This partition offers the same resource as the nodes partition, just in larger quantities per node. This can be useful if your jobs can not be parallel over multiple nodes but require large amounts of resources. |
2x AMD 7763 Processors @2.45Ghz 64 cores each CPU 1Tb RAM |
6 | node[101-106] |
| short | This partition is intended to be used for short CPU based jobs and interactive sessions. This allows users to always have resource available for installations or tests, even when the cluster is full of long running jobs. The partition uses the CPU capacity of GPU nodes, which is usually not in high use. The partition has a max runtime of 2h and can only use up to 48 CPUs per server, to prevent blocking of GPU jobs. A singe user can not request more than 256 CPUs in this partition. GPU resources can not be requested in this partition. |
2x AMD 7543 Processors @2.8Ghz 32 cores each CPU 256Gb RAM Nvidia A40 (48GB) |
20 | gpu[01-20] |
| gpu | GPU Nodes (A40) This partition is intended to be used for GPU jobs. The partition has a higher priority, so jobs in the short partition don’t prevent people from using GPUs. The partition can not be used without a GPU allocation (--gres=gpu:1). |
2x AMD 7543 Processors @2.8Ghz 32 cores each CPU 256Gb RAM Nvidia A40 (48GB) |
20 | gpu[01-20] |
| gpuplus | GPU+ Nodes (A100) This partition is intended to be used for heavy GPU jobs. The partition is not available to all users of the cluster, as the resource is scarce. The partition can only be used as part of a project with GPU+ permission. Please specify the need for these resources in your project application. |
2x AMD 7763 Processors @2.8Ghz 64 cores each CPU 512Gb RAM Nvidia HGX – 4x A100 GPU (80GB) |
4 | gpu[101-104] |
Default and Maximum Values
To ensure fair use of the system and to facilitate its maintenance, the scheduler is set up to have default and maximum values applied to submitted jobs. We might adjust these values in the future to align with the load and usage of the system.
| Resource | Default | Maximum |
|---|---|---|
| Timeout | 1 hour | 7 days |
| CPU | 1 core | - |
| Memory | 4 GB per core | - |
| GPU* | 1 | - |
*only for “gpu” partition
| Resource | Default | Maximum |
|---|---|---|
| Timeout | 14 days | 14 days |
| CPU | 1 core | - |
| Memory | 1 GB per core | - |
| Resource | Default | Max Single User | Max Project User |
|---|---|---|---|
| Timeout | 1 hour | 7 days | 7 days |
| CPU | 1 core | 256 cores | Project limits |
| Memory | 8GiB for CPU and CPU+ nodes 4GiB for GPU and GPU+ nodes |
- | Project limits |
| GPU* | 0 | 1 | Project limits |
| Concurrent Jobs | - | - | - |
*only for “gpu” partition
Quality of Service (QOS)
QOS can be specified with with each job submission using the --qos parameter. They are defined by administrators in the Slurm database and can be shows on a system using the following command:
The QOS associated with a job will affect the job in three key ways: scheduling priority, preemption, and resource limits. More information on this can be found in the official Slurm documentation here
| Name | Properties | Description |
|---|---|---|
default |
- | This is the default QOS, that is applied to every job, unless it is defined differently. |
priority |
Priority=100, Preempt=default | To be used by select users. Jobs scheduled with this QOS have higher priority and can preempt jobs of the default QOS. |
There are no QOS configured on GES-Petrarch
Info
Some QOS on MARS do not have to be set, so are not mentioned here.
| Name | Properties | Description |
|---|---|---|
normal |
- | This is the default QOS, that is applied to every job, unless it is defined differently. |
highpri |
Priority=10 | Used by administrators to schedule jobs with higher priority |
Software
On Lochan, users are responsible for their own software. Though we offer some tools through modules, that make it easier for users to manage their own software. We also offer modules for software, that have a shared license, that is managed by the University of Glasgow.
Manage shared software
If you are looking to manage shared software on Lochan, either exclusive for a specialist group or available for all Lochan users, please get in contact with the admins about requesting a domain software space.
In some cases software installed will have to be restricted due to license concerns. You will have to contact the admin team via Ivanti to get access to these software. These software include:
- Matlab
More info coming soon.
MARS uses a modular software control system to store and enable applications and tools. This means that we can install multiple versions of the same software and have these work independently for different users. All software currently available on MARS can be listed, loaded, and unloaded, by using the command module.
Below a list with all available Modules on MARS. This list is growing, as we keep installing software our users need for their work on the cluster. Don’t see the software you need? Don’t hesitate to get in contact with us!
Modules marked with a * are restricted modules. To gain access, please contact us via Ivanti Support Request.
To load a Module on MARS use the following syntax:
| Module Type | Module Name | Module Version |
|---|---|---|
| apps | alphafold* | 3.0.1 |
| apps | apptainer | 1.3.4 |
| apps | dmtcp | 3.1.2 |
| apps | java | 23.0.1 |
| apps | juliaup | 1.18.9 |
| apps | matlab* | r2024b |
| apps | miniforge | 24.7.1 |
| apps | nvhpc* | 24.9 |
| apps | nvidia-cuda | 12.6.2 |
| apps | oneapi* | 2024.2.1 |
| apps | python3 | 3.12.7 |
| apps | R | 4.4.1 |
| apps | rstudio | 2024.09.0 |
| compilers | gcc | 8.5.0, |
| libs | gcc | 8.5.0, |
| libs | openblas | 0.3.28 |
| mpi | openmpi | 5.0.5 |
Environment Modules
This is software that is centrally installed and can be used across the cluster. The full manual of modules can be found here or check our guide.
The most used commands are listed below:
| Command | Description |
|---|---|
module available |
List all available modules on the system. |
module load <name> |
Activate module for use in your current session. |
module unload <name> |
Deactivate module from your current session. |
module search <search_term> |
Search for modules by name or description. |
module list |
List all active modules in your current session. |
module purge |
Deactivate all modules loaded in your current session. |
Support
The RCaaS HPC Admin team is happy to help where possible, no matter if you are a novice or experienced user. Feel free to get in touch! All our services can be found through Ivanti: